TERMS OF USE

Please respect the time and effort that has gone into creating and writing these tutorials.
The concept, ideas, creativity and imagination for these tutorials are mine.
Any similarity to any other tutorial is purely coincidental.
Please DO NOT COPY my tutorials to any where on the web or claim as your own.
You may print them out for personal use only.
I do not give permission for my tutorials to be translated.
Please do not hotlink...this is bandwidth theft!!

Remember, tutorials are only guides to help you or to teach you.
Add your own creativity and ideas, because what you make is yours.

Please be Copyright Aware. Give credit where credit is due.

If you should have any questions or concerns, please email me.

Tuesday, June 16, 2009

♥I LOVE AMERICA♥


Photobucket


♥This is for my dear Friend, Kristi,
who has given me the confidence to do what I'm doing....thank you so much!!♥

This tutorial was written by RyLee on June 15, 2009. It's concept is copyrighted to
me, RyLee. Any creation you make from my ideas are yours. You may print this out
for your own personal use, but please do not copy it any way to put online, pass out,
or rewrite without my permission.
Please do not attempt to claim as your own.
This tutorial has been registered with TWI.

This was written in PSPX2, but will work in other versions.

For this tutorial you will need the following:

Paint Shop Pro
Animation Shop - optional

Patriotic Scrap Kif of your Choice
I used "Patriotic". It is a free to use kit by I Got Lucky Skraps.
Kristi, thank you so much for sharing your talents, you Rock!!
Pleave leave a comment if you download it.

Mask of choice
I used a mask by Vix - 341
you can get the mask by going to
Vix's PSP
on the navigation bar, click on goodies, then on masks,
scroll down until you see
March 2, 2009
masks 326-345
341 is in that zip, but please use a mask of your choice if you prefer.

Font of Your Choice
I used Matisse ITC which is a font that I paid for, therefore, I cannot share.

Tube of your choice
I used a tube by Joel Adams. You can purchase a license to use Joel's art
by visiting CILM.

Alien Skin - Xenofex 2 - Constellation

Ready to start??

REMEMBER TO SAVE OFTEN

Step 1:

Open up a new image 700 x 700, 72 dpi
flood fill with white
Open a paper of choice. I used I Got Lucky Skraps-Patriotic paper 3
Copy and paste as a new image.
Go to Layers - Load/Save mask/Load mask from disk
look for Vix 110 or one that you choose to use.
apply the mask, delete mask layer, merge group.

Step 2:

Open up the elements and look for "iglskraps_patriotic_frame6, copy and paste as a
new layer. I didn't resize, but you may want too. Open up brad2, copy/paste
"under" the frame, on top of the mask layer. This you will need to resize so the blue
frame is on the metal rim, I resized by 70%.
Position it into place. If your happy with the way it looks, in your layer palette, make
sure you are on the frame layer, then merge down.
Add a drop shadow of choice. I used v&h-2, opacity-50, blur-6.

Step 3:

Open up the element "iloveamerica", copy/paste as a new layer.
You will need to resize this so if fits into the frame.
I resized mine by 50%, but this is up to you.

Next step is Optional:
I add silver glitter around the word art.
Make sure that the word art layer is highlighted,
Selections/Select All/float/defloat/modify/expand by 6
Add a new layer "under" the word art, flood fill with glitter of choice.
Selections/Select None
Adjust/Sharpness/Sharpen

Step 4:

Open up your tube of choice,
Copy/paste as a new layer, resize to your liking.
Add a drop shadow of choice...I used v&h-2, opacity-50, blur-6.
I moved my frame over a bit so the tube wasn't blocking the "I love America"
(optional)

Step 5:

Add any elements that you want, be creative, it's your tag!!!
Don't forget to add a drop shadow.

If you don't want to Animate, now you can resize your tag to your liking,
add your artists copyrights, add your name or name or saying.
Save as a jpeg or png.

**Please when resizing, make sure the dpi is at 72**

**Just a Note: Before I added my sparkles, I resized my tag, sometimes I find that
resizing after you added noise or sparkles, makes my animation jumpy....this is my
preference, you do what you are use to doing.

If you want to Animate with sparkles.....follow me
(Optional if you don't have a tube that is holding sparklers.)

Use your magic wand with the following settings:
add(shift); rgb value; tolerance-11; feather-1, anti-alias checked
you may want to zoom in on the image, then with the magic wand, click in the middle
of each little tear drop shape (the white part) you can make these as big as you
want, it's your creation. Make sure you get each and every one.

Once your done using the magic wand, duplicate the tube twice for a total of 3 layers.
Highlight the top one, go to

Effects/Alien Skin/Xeno-Fex/Constellation with the following settings:
go to the Settings tab, open it, and choose
Lots of Stars, then apply the following settings,
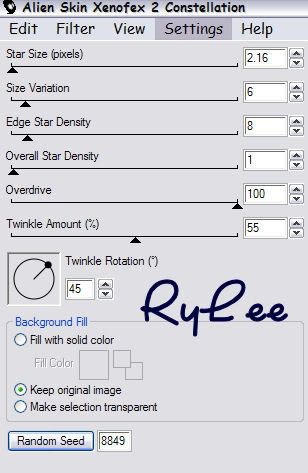
Photobucket
Close off layer 1, highlight layer 2, go to
Effects/Constellation, hit random seed, hit okay.
Close of layer 2, highlight the last layer, repeat as above.
Selections/Selection None.
Add a drop shadow of choice to all 3 layers of the tube.

Again, if you didn't do this before, make sure you add your artists copyright info,
add your name, a name or a saying.

Close off tube layers 2 and 3
click on the top of your tag, copy/copy merge
Paste as a new Animation in Animation Shop.
Repeat this process for layer 2,
paste "after current animation" in Animation Shop.
repeat for layer 3.
Once all 3 frames are in Animation Shop, review your animation.
If it looks good, save as a gif.

Thank you so much for trying my tutorial. I hope this was easy to follow and understand.
The results are yours and you should be proud. This tutorial is just a guideline or teaching
tool for some.
If you should have any questions, please give me a shout in my shout box.

Happy
Creating

Here is another result.
Use your imagination and you will love your results.


Photobucket

Monday, March 2, 2009

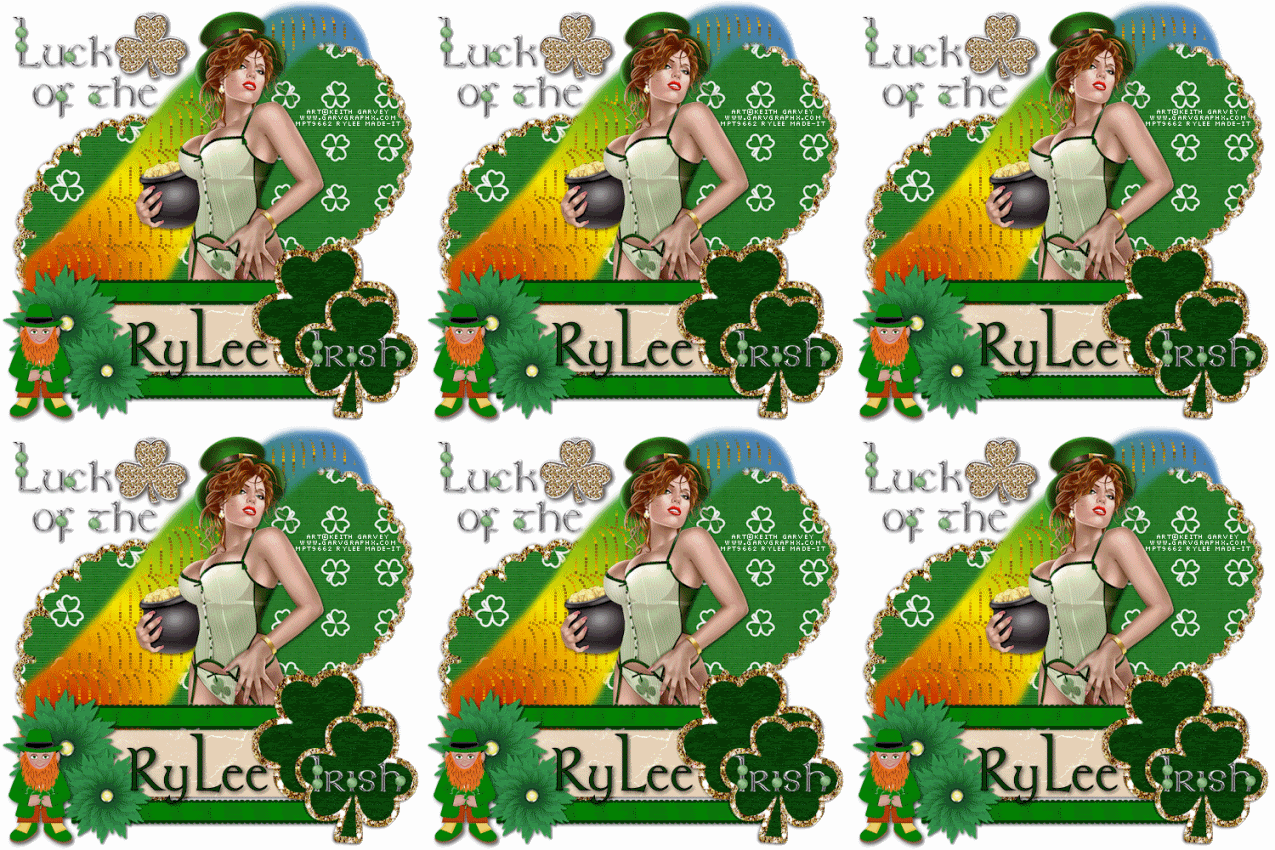
"Luck of the Irish"


I, RyLee, wrote this tutorial on March 02, 2009.

All ideas and creativity are my own and any similarity to any other tutorial is purely coincidental.Please feel free to print it out for your own personal use, but please do not claim it as your own. All materials and tubes used are copyright to their respective owners and will be credited accordingly. If there is something I have used and it is yours, please let me know so I can give you the credit you deserve.

This tutorial is registered with TWI.

Supplies:

Paint Shop Pro

Animation Shop

Tube is by Tom Hoover of My PSP Tubes, (MPT). You must have a license to use tube which you can obtain when you purchase from MPT.

Scrap kit: Luck of the Irish by RyLee’s This n That Scraps

Template: by Bluey of Blue Dream Designs

Visit her blog and look for the template “Irish Charm”

Please leave a little note of appreciate when you download the template.

Animation: Glitter tiles by Aardvark here

there are quite a few different ones to choose from as well as colors.

I used drops 2 – gold.

I couldn’t find a Leprechaun at the time I did this tag, so I made The little Leprechaun by following a tutorial by Pracken.

Which, can be found here

The tutorial is easy and goes pretty fast.

Let’s Begin!!!

Open up the template from Bluey,

Shift D to duplicate and close the original.

Go to image/canvas size/resize 700 x 700

Highlight the bottom layer and flood fill with white

In your layer palette, click on the “circle” layer to make it active.

Selections/Float/Defloat

Add, as a new layer, paper of choice

Selections/Invert/hit the “delete key” on the keyboard

Select/Invert/Modify/Select Selections Border

Use the following settings:

Check:

Both

Anti-alias

Border width – 6

Add a new raster layer on top of the circle layer, flood fill with gold glitter

Select None

Delete the circle template layer.

Make sure the border layer is activated, right click, merge down.

Add a drop shadow

V & H – 0

Opacity – 70

Blur – 7

Or a drop shadow of choice.

Duplicate this layer, resize by 85% and move into the upper right

corner. Move the larger circle to the bottom left corner.

Refer to my tag for placement of circles.

The next layer is the “thin rectangles”. For this layer, I used a ribbon from the scrap kit, resized it to about the same size of the template. Add a drop shadow of

V & H – 2

Opacity – 70

Blur – 7

Or shadow of choice

Duplicate/flip move into position.

Moving up to the “large rectangle”

Make sure it’s active in the layer palette,

Select/Float/Defloat

Paste as a new layer paper of choice.

Select/Invert/hit the “delete key” on the keyboard

Select/Select None

Add the same drop shadow as above or one of your choice.

Don’t worry about positioning that will come later.

Once done with both the thin rectangle and the large rectangle layers,

go back and delete the template layers for each.

Activate the shamrock layer

Select/Float/Defloat

Copy and paste as a new layer paper of choice

Select/Invert/hit the delete key on the keyboard

Select/Select None

Activate the “shamrock outline” layer

Select/Float/Defloat

Add a new layer, flood fill with gold glitter

Select/Select None

In the layer palette, make sure the shamrock outline is still active, right click, merge down.

Repeat with the same drop shadow.

Duplicate the shamrock, resize the duplicate by 85%

Image/Mirror

Adjust/Sharpness/Sharpen

Again, go back to the layer palette and delete the template layers for the shamrocks.

Paste your tube of choice on top of these layers.

Whew…..still with me???

Depending on what tube you use and whether it is sitting or standing, may depend on how you want to arrange your bottom layers.

Refer to my tags for reference.

Add a drop shadow to your tube

V & H – 2

Opacity – 70

Blur – 7

Or shadow of choice.

Add more elements if desired, don’t forget to add drop shadows.

I couldn’t find a rainbow that I liked,

so I created one using a rainbow gradient and the airbrush tool.

You can use whatever you want for this, but this is how I made mine.

Open up a new image, 600 x 600

Flood fill with white.

Add a new raster layer on top of the white background.

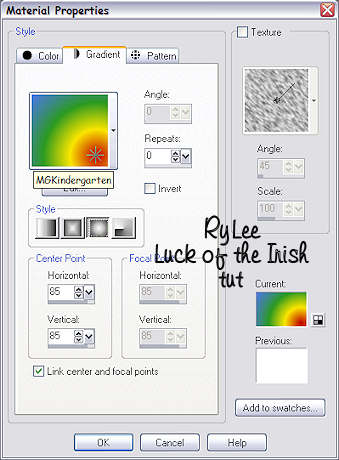
In your materials, scroll through your gradients until

You find a rainbow gradient that you like.

Use the following settings:

Photobucket

Now, we are going to use the “airbrush” tool with the following settings.

Photobucket

Starting in the upper left corner, draw out an arch or desired shape for your rainbow. (refer to my tag)

Towards the bottom of the rainbow, I just kept making it wider.

Once you have the rainbow to your liking,

Copy/paste as a new layer onto your tag.

Position it as desired.

Now, the animation.

If you don’t want to animate, now is the time

To resize your tag to your liking, add your artist copyrights, add a name, I used Leprechaun Hats as the font for the top tag and KellsFLF on the bottom tag. The choice is yours.

Save as a jpeg or png.

That’s it!!!

Animation

Now, if you want to animate the rainbow, the best thing to do is to close everything in PSP except your tag. It will be less confusing.

Open Animation shop and find the animation that you want to use.

Edit/Select All

Copy

Paste back into PSP as a new image.

Depending on the animation, depends on how many layers or frames you will have.

Now, you might know an easier way to do this, then go for it, but this is the only way I know how….lol

On your tag, highlight the rainbow so it’s active.

Select/Float/Defloat

Select/Modify/contract by 8

(This number may differ depending on the width of your rainbow)

DO NOT DESELECT

If your rainbow is going to facing the opposite direction, make sure you mirror

each frame of the animation before you start to flood fill.

Add a new raster layer above your rainbow, rename it G1

Highlight your animation, rename each layer G1, G2, G3, etc until all layers are renamed.

In your materials palette, click on the foreground box and then on the patterns tab. Find the animation/pattern and select it,

Go back to the tag, make sure the layer G1 is highlighted, flood fill with the animation.

Add a new raster layer, rename G2,

Go back to the animation, hide G1, highlight G2,

Go to the patterns tab and select the animation. Be careful not to select the “current” image because that is the G1 animation and you will end up with the same pattern.

Go back to the tag, flood fill layer G2 with the animation.

Repeat this step until all the layers are added.

It is time consuming and a little confusing....lol

Once all the animation layers are added to the tag,

Select/Select None.

Hide all the animations layers except G1,

Copy/copy merge into AS as a new animation.

Back to PSP, hide G1, unhide G2,

Copy/copy merge into AS after current image.

Repeat this until all layers are in AS. Depending on the animation, depends on the number of frames. If you used the one I did, you should have 8 frames.

View your animation.

If it appears that the animation is running backwards,

Go to Edit/Select All

Animation/Reverse Frames

View your animation again.

If all looks okay,

Save as a gif.


That’s it, if you made it this far, thank you!!!!

I’m still in the learning stages of writing tuts.

This tut if for guidance only, you don’t have to use the elements or colors or papers that I have. Use your imagination and make the tag to suit you.