

Pink Crush
I, RyLee, wrote this tutorial on January 26, 2009. Any similarity to any other tutorial is purely coincidental. Please feel free to print it out for your own personal use but please do not claim it as your own. All materials and tubes used are copyright to their respective owners and will be credited accordingly. If there is something I have used and it is yours, please let me know so I can give you the credit you deserve.
This tutorial is registered with TWI.
This tutorial assumes that you have good knowledge of PSP.
Supplies Needed:
Paint Shop Pro
(I used PSPX2, but can be done in any version)
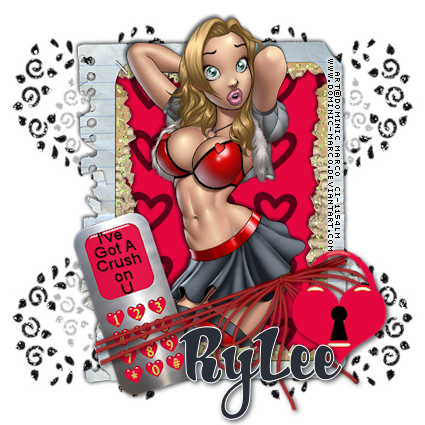
Tube of choice. I am using the cutest tube from Dominic Marco. You can purchase this tube from CILM. You must have a CILM license number in order to use this tube.
The scrap kit is a PTU kit called “Crush”
by Kristi from I Got Lucky Skraps
Mask of choice or the one I used is by Vix 177
Visit Vix PSP, tab over to “goodies” and browse through her masks.
Glitter is from Sentimental Style set 4
Remember to leave a little note of "thanks" in a shout box or
comment box after downloading the supplies.
Let’s Begin!!
Open up the glitter or paper of choice in PSP and minimize.
Open up a 600 x 600 transparent image, 72 dpi.
Flood fill with white.
Choose a frame of choice, copy/paste as a new layer, resize. Depending on the kit you use, you may have to resize a few times to get the desired size.
The frame is from Kristi’s kit, I resized the frame by 65%.
Image/free rotate, 90 degrees to the left.
Adjust/sharpness/sharpen.
Using your magic wand, click inside the frame,
Selections/modify/expand by 15. (this number will vary depending on the
Frame you use.) Choose a paper of choice, copy/paste as a new layer under the frame. You may want to resize the paper. I resized by 75%.
Selections/invert, make sure you are on the paper layer, hit delete on the key board.
Selections/select none.
Copy/paste tube of choice. Resize and crop according to your
Preference. To get the effect of the image hanging over the frame,
I duplicated the frame, move the duplicated frame above the image, (your layer palette should be as follows:
Frame
Image/tube
Frame
Paper
White background
I used the lasso tool and outlined the part of the frame I wanted to delete, making sure the top frame layer is highlighted, hit delete on the keyboard.
Selections/select none.
Add a drop shadow to the Bottom frame layer.
I used vert/horiz. 2, 65, 7
Apply
Add drop shadow again, changing the vert/horiz to -2.
Apply
Add a drop shadow of choice to the image/tube.
Add any elements or embellishments of choice.
Add a drop shadow to each.
Open up your Materials palette, click on the pattern tab,
Scroll until you find the glitter that you have minimized, select.
Add new raster layer above the white background layer,
Flood fill this new layer with the glitter or color of choice.
Layers/Load/Save Mask/Load Mask from Disk
Scroll until you find Vix_177 mask or mask of choice.
You can add brushes if you want instead of a mask, the choice is yours, it’s your tag.
Depending on the mask you use, you have the option of resizing the mask so it’s a bit bigger than the original. On the tag below, I resized the mask by 105% so more of the mask layer was visible.
Now to resize.
Image/resize
Make sure lock aspect ratio is checked, change to the size you want,
(I usually resize between 400-425, good size if you are emailing)
Make sure you resize in pixels,
Check that you are resizing at 72dpi,
All layers are checked,
Click okay.
Finally, add your copyright information. Make sure the copyright is visible and is clear, and you have your appropriate license number, if you are using a PTU image.
Add your name or saying of choice in the font of choice.
Merge visible and save as a jpeg or png.
That’s it, all done.
Thank you for trying my tutorial.
Here is another tag using "Crush" by Kristi.
I, RyLee, wrote this tutorial on January 26, 2009. Any similarity to any other tutorial is purely coincidental. Please feel free to print it out for your own personal use but please do not claim it as your own. All materials and tubes used are copyright to their respective owners and will be credited accordingly. If there is something I have used and it is yours, please let me know so I can give you the credit you deserve.
This tutorial is registered with TWI.
This tutorial assumes that you have good knowledge of PSP.
Supplies Needed:
Paint Shop Pro
(I used PSPX2, but can be done in any version)
Tube of choice. I am using the cutest tube from Dominic Marco. You can purchase this tube from CILM. You must have a CILM license number in order to use this tube.
The scrap kit is a PTU kit called “Crush”
by Kristi from I Got Lucky Skraps
Mask of choice or the one I used is by Vix 177
Visit Vix PSP, tab over to “goodies” and browse through her masks.
Glitter is from Sentimental Style set 4
Remember to leave a little note of "thanks" in a shout box or
comment box after downloading the supplies.
Let’s Begin!!
Open up the glitter or paper of choice in PSP and minimize.
Open up a 600 x 600 transparent image, 72 dpi.
Flood fill with white.
Choose a frame of choice, copy/paste as a new layer, resize. Depending on the kit you use, you may have to resize a few times to get the desired size.
The frame is from Kristi’s kit, I resized the frame by 65%.
Image/free rotate, 90 degrees to the left.
Adjust/sharpness/sharpen.
Using your magic wand, click inside the frame,
Selections/modify/expand by 15. (this number will vary depending on the
Frame you use.) Choose a paper of choice, copy/paste as a new layer under the frame. You may want to resize the paper. I resized by 75%.
Selections/invert, make sure you are on the paper layer, hit delete on the key board.
Selections/select none.
Copy/paste tube of choice. Resize and crop according to your
Preference. To get the effect of the image hanging over the frame,
I duplicated the frame, move the duplicated frame above the image, (your layer palette should be as follows:
Frame
Image/tube
Frame
Paper
White background
I used the lasso tool and outlined the part of the frame I wanted to delete, making sure the top frame layer is highlighted, hit delete on the keyboard.
Selections/select none.
Add a drop shadow to the Bottom frame layer.
I used vert/horiz. 2, 65, 7
Apply
Add drop shadow again, changing the vert/horiz to -2.
Apply
Add a drop shadow of choice to the image/tube.
Add any elements or embellishments of choice.
Add a drop shadow to each.
Open up your Materials palette, click on the pattern tab,
Scroll until you find the glitter that you have minimized, select.
Add new raster layer above the white background layer,
Flood fill this new layer with the glitter or color of choice.
Layers/Load/Save Mask/Load Mask from Disk
Scroll until you find Vix_177 mask or mask of choice.
You can add brushes if you want instead of a mask, the choice is yours, it’s your tag.
Depending on the mask you use, you have the option of resizing the mask so it’s a bit bigger than the original. On the tag below, I resized the mask by 105% so more of the mask layer was visible.
Now to resize.
Image/resize
Make sure lock aspect ratio is checked, change to the size you want,
(I usually resize between 400-425, good size if you are emailing)
Make sure you resize in pixels,
Check that you are resizing at 72dpi,
All layers are checked,
Click okay.
Finally, add your copyright information. Make sure the copyright is visible and is clear, and you have your appropriate license number, if you are using a PTU image.
Add your name or saying of choice in the font of choice.
Merge visible and save as a jpeg or png.
That’s it, all done.
Thank you for trying my tutorial.
Here is another tag using "Crush" by Kristi.


No comments:
Post a Comment