
I, RyLee, wrote this tutorial on January 24, 2009. The ideas and creativity are mine. Any
similarity to any other tutorial is purely coincidental. This tutorial is register with TWI.
Supplies Needed:
3-4 tubes of choice, the tubes must be from the same artist.
When choosing tubes for this tut, it would work better if the images are standing.
I am using the amazing artwork of Mark Yanko. You MUST have a license to use his art which you
can purchase from CILM. You can also visit his website, Mark Yanko to view more of his fantastic art and to
learn a little bit about him. He is an amazing artist and person.
SUPPLIES
Eye Candy 4000 - Gradient Glow and Chrome
Either a mask of choice or a brush of choice for the background. I used a brush that I have had
for a while. I'm sorry, I don't know who it belongs too. If it's yours, please notify me and I will
be happy to give you the credit you deserve.
This tutorial may look complicated, but it is very easy if you have some knowlege of PSP. This was
done in PSPX2, but can be done in all versions.
Let's begin.
Open up an image 700 x 500, 72 dpi, transparent.
Flood fill with white.
Choose the 3-4 images you want to use, open them, but minimize them for now.
Grab your preset shape tool, rectangle, foreground/stroke properties is Black, line width 15, solid.
Draw out a rectangle that is long but narrow. See my tag above for reference. Convert to raster
layer.
Duplicate this rectangle move to the middle leaving a small space between them.
Duplicate one more time, move into position. Make sure that they line up evenly and that the spaces
between them are about even. Hide the white background layer, merge visible.
To give the frame a little pizzazz, I added a barbwire effect. This is optional.
Grab your preset shape tool again, rectangle, tab over to the Line Style box, and scroll until you
find a line style that you like. I used Barbed Wire, line width 3, choose a color in your
foreground/stroke properties that you will be able to see on top of the black rectangle. It
doesn't matter what color because once you apply the filter, it will look like chrome.
Draw out a rectangle on top of the black frame. Make it just a bit smaller than the frame.
Convert to raster layer.
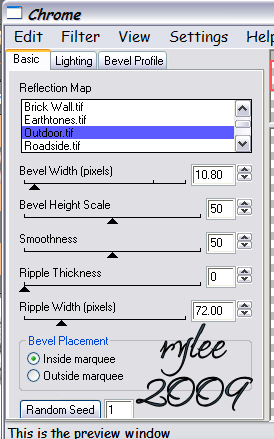
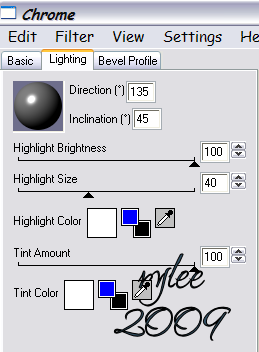
Effects/Eye Candy 4000/Chrome with the following settings:
Duplicate this layer twice. You can flip and mirror them so they look different on each frame. I
also used Adjust/Sharpen on each of the chrome layers just to give them a bit more sharpness and
shine.
Make sure they are lined up, hide the frame layer and the white background, and merge the chrome
layers visible.
Now for the fun part. Choose one of your tubes, copy and past as a new layer. Move the tube into
the first frame. (I have the tubes positioned on top of the chrome layer). Resize the tube so it
just fits inside the frame. Refer to my tag for placement.
Most artist allow you to mirror the Images, however, if you are using Mark Yanko tubes, please
follow his TOU's. He does not allow mirroring.
Once you have the tube to where you like it, Selections/select all/float/defloat, you should have
marching ants around the tube, add a new raster layer, flood fill with black. You should have a
black image of the tube, delete, the tube layer so you will be left with just the black image.
Repeat this step for the other two frames.
Now that you have all the images in their frames, you can now select the Selections tool, rectangle
and postition the tool over the inside edge of the bottom of the frame. We want to delete any part
of the image that is hanging over. Draw a rectangle the length of all 3 frames making sure that you
have all pieces of the image that you want deleted inside the rectangle. see below
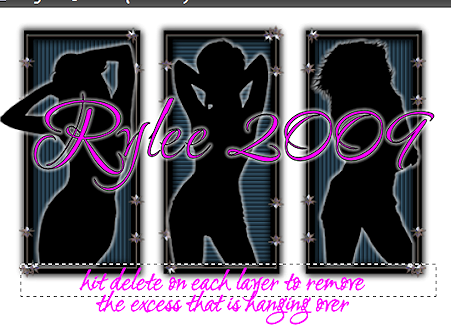
Highlight your first image,
hit delete on your keyboard. Repeat this step for the other two images.
Okay, now you are going to resize the tag, if you want a smaller tag. The reason I am resizing now,
is because when I applied the blind effect to each of the frames, the effect became distorted
after I resized. To keep the clean, sharp effect of the blinds, I found that it is best to resize
before applying it.
Image/resize make sure lock aspect ratio is checked, all layers is checked, and change the size of
the pixels. I normally resize anywhere from 400 to 450 depending on the tag. For this particular
tag, I resized to 450. click okay.
Note: if you are using a scrap kit please make sure that the dpi is at 72.
Add a new raster layer above your white background. Use your magic wand, click inside each of
the black frames, Selections/modify/expand by 4. Highlight the new raster layer, Flood fill with
black or a dark color of choice from your main tube, selections/select none.
Highlight the black fram layer again, use the magic wand and click inside the first and the third
frame.
Effects/texture effects/blinds and apply the following:
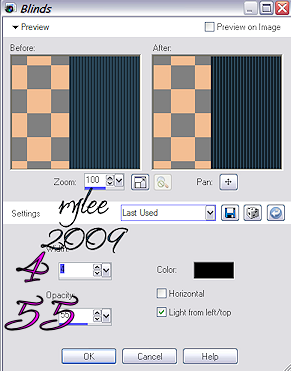
These settings are just a guide. You can play with the settings and the color to achieve the look
that you like the best. Selections/select none.
Highlight the frame layer one more time, use your magic wand and click inside the middle frame
only.
Effects/texture effects/blinds, everything stays the same except check the "horizontal" box.
Selections/select none.
Highlight your blackframe layer and give it a drop shadow. I used v-h, 2, 71, 8. Repeat changing
the v-h to -2.
You can use Eye Candy 4000 to give each of your black silouettes a white glow effect to make
them stand out just a bit.
I used thin white glow set at 3. You may have to use the selection tool one more time to get rid of
the white glow that is hanging over the frames from the images.
You can give them each a slight drop shadow. I used v&h 0, 71, 8.
At this point, I hide my white background and merged visible all the layers. This way, if you need
to adjust the silouette layer, you can easily without messing each layer up, or you can lock each
layer. This is up to you.
Add your main image as the top layer. Resize and move into position. Add a drop shadow of choice.
Add a new raster layer above your white background layer. This is where you can add a mask or
some brushes. This is up to you, be creative.
Add your artist copyright information and your license number if applicable. If you are using a
PTU artist, then a license number is required. Please make sure that the copyright information is
visible and is clear.
Choose a font of choice, add a name or saying.
For the tag above, I used a font fat, ArabBrud, size 100, stroke 3, foreground/stroke color of
choice. Type out the name, position it, convert to raster layer. Add a new layer under the name,
use your magic wand, click inside each letter, selections/modify, expand by 1 or 2 depending on the
width of the outline, flood fill with color of choice, then apply the blind effect, using vertical or
horizontal, apply, selections/select none. This is optional.
Save as a jpeg or png.
That's it, your done.
Thank you for trying my tutorial, and I hope you enjoyed it.
I'm fairly new to tutorial writing, so I hope this was easy to follow and understand.
Remember, tutorials are only guides, be creative add things, change colors, etc., give it your own
flair. The finished tag is yours.
Here is another example of the tag using the beautiful artwork of Barbara Jensen.
You must have a license to use her art, which you can purchase from her website.
Barbara Jensen




No comments:
Post a Comment